Photeeq lens flare is transforming how photographers capture that perfect cinematic glow – but most people are using it completely wrong.
You know that feeling when you see a photo that stops you mid-scroll?
The kind where golden light streams across the frame like liquid magic?
That’s not accident – it’s lens flare mastery.
Here’s what happens when you nail lens flare effects: your ordinary sunset becomes a movie poster, your portrait sessions look like they cost five figures, and your clients start asking “how did you DO that?“
By the end of this guide, you’ll know exactly how to use Photeeq lens flare to create those jaw-dropping light effects that separate amateur snapshots from professional masterpieces.
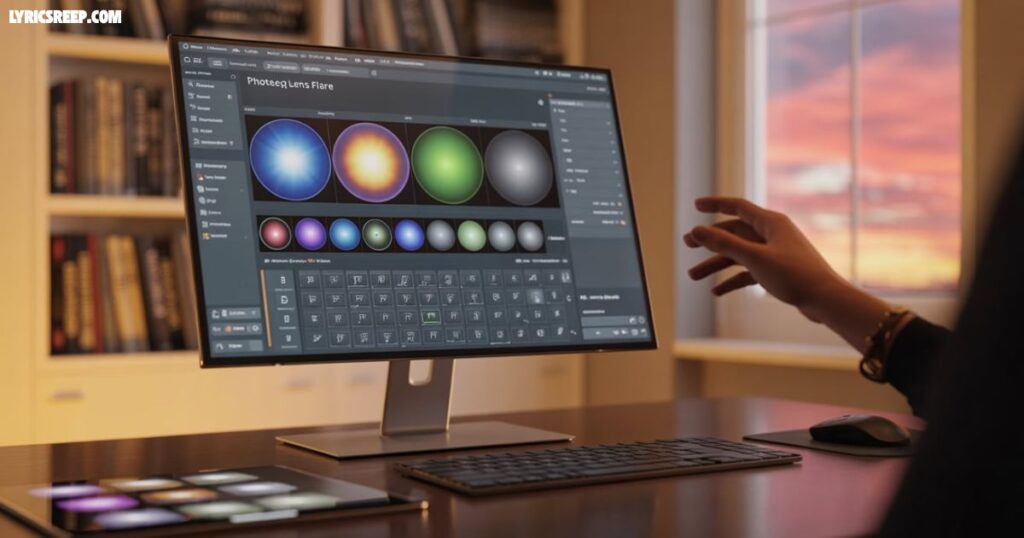
What is Photeeq Lens Flare?
Photeeq lens flare is a specialized photo editing plugin that recreates realistic light effects in your images. Think of it as your digital cinematographer. While basic filters slap generic overlays onto your photos, Photeeq actually simulates how light behaves when it hits camera lenses in real life.
The software creates authentic sunburst flares, anamorphic streaks, bokeh circles, and ghosting effects that look like they were captured naturally. No more fake-looking Instagram filters.
Read More: Ranu Bombai Ki Ranu Song Lyrics – Prabha | Ramu Rathod,. 4W
Instead, you get optical physics recreated digitally – the same light behavior that makes Hollywood movies look so cinematic.
Photeeq lens flare works as a plugin for major editing platforms like Adobe Photoshop and Adobe Lightroom. This means it integrates directly into your existing workflow without forcing you to learn entirely new software.
Why Choose Photeeq Lens Flare?
Customizable Effects
Photeeq lens flare doesn’t believe in one-size-fits-all solutions. You get granular control over every aspect of your light effects.
Adjust the brightness, modify the color temperature, control the flare intensity, and position effects pixel-perfect.
Want soft romantic glow for wedding photography?
Done.
Need dramatic cinematic flare for urban landscapes?
Also done.
The customization options let you match any mood or artistic vision.
High-Quality Results
Here’s where Photeeq separates itself from amateur tools.
- The plugin uses advanced algorithms that understand light physics.
- When you add lens flare effects, they respond to your image’s existing lighting conditions.
- If your photo has warm golden hour tones, the flare automatically suggests complementary colors.
- If you’re working with cool blue shadows, it adapts accordingly.
This intelligent approach creates realistic light rendering that looks natural, not artificial.
Ease of Use
Professional results shouldn’t require a PhD in optics. Photeeq lens flare features an intuitive interface that makes complex light effects accessible to photographers at every skill level.
The plugin installation process takes minutes, not hours. Preview changes in real-time before committing to any edits. Drag-and-drop positioning means you can place effects exactly where they make visual sense.
No guesswork required.
How to Use Photeeq Lens Flare in Your Workflow
Import Your Image
Start by opening your base photo in Adobe Photoshop or Adobe Lightroom.
Choose images that already have interesting light sources – windows, streetlights, the sun, or bright reflections. Photeeq lens flare works best when it enhances existing light rather than creating it from nothing.
Import high-resolution files when possible. The plugin’s effects scale better with more pixel data to work with.
Select the Flare Type
Photeeq offers several distinct flare categories:
- Anamorphic flare creates those horizontal streaks you see in blockbuster movies.
- Bokeh flare produces soft, circular light spots perfect for dreamy portraits.
- Sunburst flare generates dramatic rays extending from bright light sources.
- Ghosting effects add subtle lens reflections that suggest authentic optical behavior.
Each type serves different creative purposes. Match your selection to your image’s mood and intended impact.
Customize the Settings
This step separates beginners from pros.
- Brightness adjustment controls how intense your flare appears.
- Start subtle – you can always increase intensity later.
- Color grading options let you match the flare to your photo’s existing palette.
- Blending modes determine how the effect interacts with your base image.
- Soft light creates gentle integration.
- Overlay provides more dramatic results.
Screen mode works well for dark backgrounds.
Preview and Save
Always preview your effects before finalizing. Photeeq lens flare shows changes in real-time, but different monitor settings can affect how effects appear.
Check your edits on mobile devices if you’re posting to social media. Save your work as a layered file to preserve editing flexibility. Export final versions in appropriate formats for your intended use.
Applications of Photeeq Lens Flare
Photography
Wedding photography editing benefits enormously from subtle lens flare effects.
Ceremony photos taken during golden hour can be enhanced with warm, romantic glows. Reception images often have interesting light sources – chandeliers, candles, string lights – that work perfectly with bokeh flare effects.
Portrait photography uses lens flare to add warmth and dimension. Backlit subjects can be enhanced with rim lighting effects that make people appear to glow. Urban landscape editing employs dramatic flares to emphasize cityscapes during sunrise or sunset.
Street photography benefits from authentic-looking light interactions with architectural elements.
Cinematography
Video creators use Photeeq lens flare for still frame enhancement and motion graphics work. Cinematic light effects add production value to independent films and commercial projects.
The plugin’s realistic optical behavior mimics expensive cinema lenses without the equipment cost. Color matching capabilities ensure flare effects integrate seamlessly with existing footage grades.
Graphic Design
Digital composites often require believable light effects to sell the illusion. Fantasy photo effects use dramatic flares to suggest magical or supernatural elements.
Commercial design work employs subtle flares to draw attention to products or text elements. Creative photo editing projects benefit from the artistic flexibility Photeeq provides.
Tips for Achieving the Best Results
Avoid Overuse
The biggest mistake new users make?
Cranking everything to maximum intensity. Real lens flare effects are often quite subtle. They enhance existing light rather than creating nuclear explosions across your frame.
Read More: Pathavaikum Parvaikara (Chuttamalle Tamil Song) Lyrics – Devara
Start with conservative settings and gradually increase impact until the effect feels natural. Remember: viewers should feel the enhancement, not necessarily notice it consciously.
Match the Light Source
Light source direction must make physical sense. If your sun is positioned on the left side of the frame, your flare shouldn’t emanate from the right.
Photeeq lens flare provides precise positioning controls for this reason. Study how real lenses behave in bright light conditions. This understanding will inform better digital recreation decisions.
Experiment with Colors
Color harmony adjustment can make or break your lens flare effects. Cool-toned images (blues, greens, purples) work well with complementary warm flares (oranges, yellows).
Warm-toned photos can benefit from cooler flare accents for visual interest.Analog film aesthetic often features slight color shifts in lens flares – experiment with subtle tinting. Don’t be afraid to break conventional color rules if the result serves your artistic vision.
FAQs about Photeeq Lens Flare
Can beginners use Photeeq Lens Flare?
Yes, Photeeq Lens Flare is beginner-friendly with a simple interface, easy installation, and presets that make editing effortless.
How customizable is Photeeq Lens Flare?
It’s highly customizable, allowing users to adjust brightness, size, color, rotation, and blending for unique light effects.
Does Photeeq Lens Flare work on all images?
It works best on images with light sources, but can enhance most photos when applied carefully with blending options.
Conclusion
Photeeq lens flare transforms ordinary photos into cinematic masterpieces when used thoughtfully. The key lies in understanding light behavior, choosing appropriate effects for your image’s mood, and applying enhancements with restraint. Master these photo enhancement techniques, and you’ll create images that capture attention and hold it.
Your photography will develop that professional polish that separates casual snapshots from compelling visual storytelling. Start experimenting with subtle effects on your existing photo library.
Practice light manipulation until the techniques become second nature. Soon, you’ll intuitively know exactly which lens flare effects will elevate each image to its full potential.
Remember: the best digital effects feel completely natural – like they were always meant to be there. That’s the true power of mastering Photeeq lens flare.